Learn how to make a flexagon, a most fascinating geometric toy! It looks like an ordinary paper hexagon with a front and a back, but hidden inside is a third side (or face) that can be brought to the outside by flexing the paper.
Flexagons are folded paper polygons that have the neat feature of changing faces as they are flexed. There are many types of flexagons. The names of flexagons tell the type of polygon and the number of faces. In this project we make a tri-hexaflexagon—a six-sided polygon (hexagon) with three faces (tri).
Related crafts: Make a Hexa-hexaflexagon—it has six faces! (and is a little harder to make) Or try a square flexagon in the Tri-tetraflexagons craft project.
Flexagons were discovered over fifty years ago by a graduate student, Arthur Stone, playing with scraps of paper. The first flexagon he made was the tri-hexaflexagon. He had folded a strip of paper diagonally in three places to form a hexagon. When he flexed the hexagon in a certain way, a third face was revealed. He found this to be very interesting. After thinking about it overnight, he constructed a hexagon that when flexed produced six different faces—hexa-hexaflexagon. After that many of his friends joined him in the fascinating study of flexagons, and many more types of flexagons were discovered.


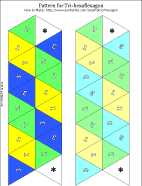
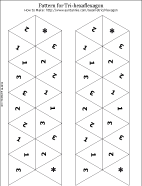
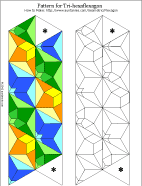
Choose a tri-hexaflexagon to make. Download and print the pattern. Choose a design that prints in color, or select a black & white (B&W) pattern and use your creativity to add color and designs. You might want to start with the pattern with numbers on each face—1, 2 and 3. The Dots pattern coordinates with the dot patterns in the Geometric Solids craft project.
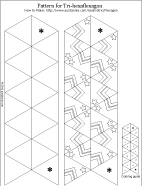
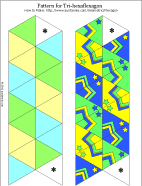
On the Stars pattern, half of the fold lines are marked on each side, so you will need to score on both sides. It's best to make another pattern first for experience in scoring and folding.
On the Equilateral triangle patterns, the fold lines are thicker than the lines for the individual, smaller triangles. Select the black & white (B&W) Equilateral pattern to color the triangles as you choose.
Patterns are Adobe PDF files. The Adobe Reader is available for free.
All of Aunt Annie's project patterns are designed to be printed on standard letter-size paper (8.5"x11" or A4). When printing from Adobe Reader, you may need to select Auto-Rotate and Center or Choose paper source by PDF page size to ensure the best fit.
Color the pattern template as you like with markers, colored pencils or crayons. You don't need to color the glue tabs marked with '*'.
Cut around the pattern on the outline. Try to make the cuts very straight and accurate. There will be one piece with twenty triangles.

Make a double thickness by folding the pattern piece in half lengthwise and glue. To make a sharp, straight fold, first score on the fold line.
To score: Use a ruler and the empty ballpoint pen (or bone folder) to make an indent along the fold lines.

Score and fold back and forth on all the solid lines. Do this for each of the 10 triangles of the tri-hexaflexagon.
Place the folded pattern with the side without glue tabs facing up, and the end with a green (2) triangle to the left. Fold back on the line between the yellow (3rd) and blue (4th) triangles (1 and 3)—four yellow triangles (1s) are together now. Fold back on the line between the yellow and blue triangles (1 and 3). Now you should be able to see five yellow triangles (1s). Pull the yellow triangle (1) forward that is behind the green triangle (2). There should be six yellow triangles (1s) on top and a blue triangle (3) to the side. Fold the blue triangle (3) back.
The two glue tabs marked with '*' are now face-to-face. Glue them together. Wait for the glue to dry before flexing your flexagon.
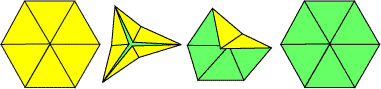
Fold the flexagon to bring together three alternate corners of the flexagon. The top of the flexagon will pop open if there is a new face to reveal. If it doesn't pop open, flatten the flexagon and try again with the other three corners.
As you flex the flexagon in this project, see if you can find all the possible combinations of faces. The tri-hexaflexagon has three faces in three combinations.
That's it! Your flexagon is done!

Related projects: To make a hexaflexagon with six faces, see the Hexa-hexaflexagons craft project. Make a hexagonal box to store your hexaflexagons or give a Flexagon Boxed Set as a gift.

Tip: The numbered patterns are geared towards classroom use. For the most creativity, use the black & white pattern and have the students color the triangles for each numbered face in a different color or/and pattern.

Tip: Make a variety of flexagons to share with your friends. Color the smaller triangles on the black & white (B&W) Equilateral pattern to make interesting designs on each face of the flexagon.


Tip: Print the blank black and white pattern and decorate the faces any way you like!

Tip: The Dots and Triangles patterns coordinate with the dot patterns in the Geometric Solids craft project.