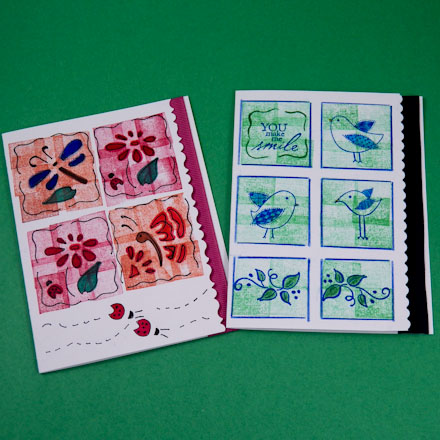
Create cards to have on hand that can be used for any occasion. These cards feature a ribbon backed decorative cut edge and stamped block backgrounds. (Solid colored paper may be substituted for the ribbon.) Use these card ideas as a springboard to make cards of your own design using the tools and supplies available. You can use rubberstamps, stencils, punches, stickers or simple line drawings to create the feature elements for your card.
The techniques for making ribbon edge cards and creating a background rubberstamp are explained in the Ribbon Edge Christmas Cards tutorial from Aunt Annie's Card Class 2. See this tutorial for detailed instructions, and if you are new to card making, review the Greeting Card Class tutorials for ideas and basic techniques. For how to make envelopes, see the Four Patch Cards tutorial or see the Envelopes to Make craft project for envelope templates and instructions.
Scroll down to see the materials and instructions for both card designs. Refer to the Ribbon Edge Christmas Cards tutorial for step-by-step instructions.
Prep work: If you don't have one, make a 5/8" by ¾″ background stamp—see how to make. Cut scallops with decorative scissors along the right edge of the card front following the instructions in Step 2 of the Ribbon Edge Christmas Cards tutorial. Use the pencil and ruler to lightly draw the six blocks on the card front: 4-1½" squares and 2-1½" by 1¼" rectangles. Tip: Pre-stamped blocks in green are included on the stamped squares printable.
To make the card: Follow the instructions in the Ribbon Edge Christmas Cards tutorial, steps 5 thru 8. Lightly stamp the six blocks in green using the background stamp. Outline the blocks with a blue colored pencil, stamp the rubberstamp images in blue and color them in with a green colored pencil. Further enhance the message block by drawing a border around the message using the green pencil. Glue the blue ribbon inside the the card so it is behind the cut front edge.
Prep work: If you don't have one, make a 5/8" by ¾″ background stamp—see how to make. Cut the right edge of the card front with the majestic decorative edge scissors following the instructions in Step 2 of the Ribbon Edge Christmas Cards tutorial. Use the pencil and ruler to lightly draw the four 1¾″ blocks on the card front, leaving 1¼" blank at the bottom of the card. Tip: Pre-stamped blocks in red and orange are included on the stamped squares printable.
To make the card: Follow the instructions in the Ribbon Edge Christmas Cards tutorial, steps 5 thru 8. Lightly stamp two blocks with red and two blocks with orange using the background stamp. Use the fine-tip black marker to trace a stencil image onto each block and to draw a border around each image. Trace one or two ladybugs or caterpillars near the bottom center of the card front and use the black marker to add dashed crawling trails. Color the traced images in with the markers. Glue the red ribbon inside the the card so it is behind the cut front edge.
That's it! Now you have the idea!
