

Create sturdy oval boxes with fitted lids inspired by traditional bandboxes. Wrap a long cardstock strip around an oval base to build this classic style of box for gifts, favors, storage, keepsakes, or display. These printable patterns include two box sizes plus graduated oval templates for decorating the lids.
All patterns print on Letter/A4 cardstock. Print on white or colored cardstock, or on the reverse side of decorative cardstock to create one-of-a-kind boxes that are as practical as they are attractive.
| Box Name | Dimensions | Uses |
|---|---|---|
| Small Oval Box | 3.5" × 2.6" × 0.9" | Gift cards, small jewelry, mint tins, tea sachets, seed packets, individually wrapped candies |
| Medium Oval Box | 4.75" × 3.5" × 1.3" | Artisan soap bars, playing cards, embroidery scissors, full floss skeins, mini journal & pen set, or macarons |
Each pattern is a PDF file that prints on standard Letter/A4 paper.
Choose an oval box pattern and print it on Letter/A4 cardstock. The small oval box includes both the bottom and lid on a single pattern. The medium oval box has separate patterns for the bottom and lid.
Tip: For a sturdier box, print the pattern on paper and transfer it to Bristol board or similar flexible poster board.
Cut out all the box bottom pattern pieces on the solid lines. Repeat for the lid after assembling the bottom.
Tip: For the medium box, glue the two side-strip pieces together before shaping the box.
Score along the base of the glue tabs on each side strip using a ruler and either a bone folder or an empty ballpoint pen.
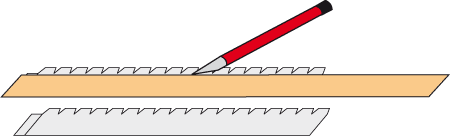
Tip: For heavier materials, make a shallow half-cut instead of an embossed score.
Fold the tabs over, then unfold to about a 90° angle.

Tip: When using cardboard, fold back with the score on the outside of the box. With cardstock, fold with the printed side inside.
Gently curve the side strip around the oval base to shape it before gluing. Test the fit and trim the side strip if it is too long. If it is too short, trim the oval base slightly.

Glue the tabs to the oval base, wrapping the side strip around the edge as you work. Glue the overlapping ends of the side strip together.
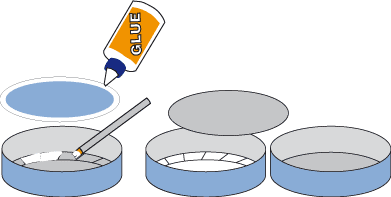
For a finished look, glue the other oval cutout over the tabs to complete the box bottom.

Repeat Steps 2 through 7 to assemble the lid. Before attaching the second lid oval, optionally cover the lid sides with decorative paper or ribbon for a traditional bandbox appearance.

Tip: If the decorative strip is wider than the lid's depth, align one edge to the lid's open edge. Cut glue tabs on the other edge, fold and glue over existing tabs.
Decorate the lid with contrasting papers, medallions, or other embellishments. Use the graduated oval templates to cut decorative inserts that fit perfectly.

Tip: For more details, variations, and additional patterns, visit the Oval Box page.


Oval Box Craft Project

Tip: Looking for detailed assembly instructions, printable color patterns, decorative designs, and variations? Visit the Oval Box craft project.
Traditional Bandboxes

Tip: Bandboxes were lightweight paperboard boxes used to store and transport hats, collars, ribbons, sewing supplies, and other delicate belongings. Traditionally covered with wallpaper and often lined with newspaper or other paper, they inspired the wrap-around construction used for these printable oval boxes.
Decorate these printable oval boxes with your favorite papers to create your own keepsake boxes.
Customize the Height

Tip: Increase the height of an oval box by making the side band deeper before assembly or by adding an inner collar after the box is assembled. Use the bottom side pattern as a template, adding ½" to ¾" to the height.
Decorative Paper Idea

Tip: Covering the side band with decorative paper is an easy way to customize your box. Striped, floral, wrapping, scrapbook, or handmade papers all work well.


