

This project features a collapsible box with an attached lid in a variety of sizes and shapes. Choose from boxes with several fun designs, including ones for Mother's Day and Valentine's Day.
If you haven't made boxes before, you'll be delighted with how easy it is to make a box in exactly the size you need. Use these boxes for gifts, as decorative containers, or for organizing and storage around the home or craft room. Make a simple 2" cube, a tall box, and a short box with the printable patterns. Or, follow the instructions for making a collapsible box in any size you wish. After you are done with the box, it can be folded flat and stored away for use another time.
Custom size box: To make a collapsible square box in any size you like, follow the instructions for drafting your own box pattern in the Custom Collapsible Square Box Pattern craft project.
Related craft: For a different version of the cube collapsible box, see the Little Gift Boxes craft project. This project include Christmas-themed patterns.


Choose a box to make. Download and print the pattern. Make a lightweight box by printing directly on cardstock. For a stronger box, print on computer paper and trace or transfer the pattern to cardboard before proceeding. Or, follow the instructions for making a collapsible box in any size you wish.
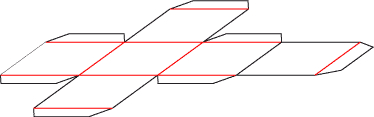
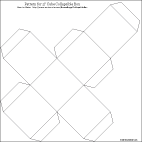
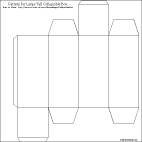
Note: The strip of squares in the center of the pattern are the box sides. The glue tab is at the end. The other two squares are the top and bottom lids. Each lid has a flap attached. Two of the sides have a pair of box flaps attached.
Patterns are Adobe PDF files. The Adobe Reader is available for free.
All of Aunt Annie's project patterns are designed to be printed on standard letter-size paper (8.5"x11" or A4). When printing from Adobe Reader, you may need to select Auto-Rotate and Center or Choose paper source by PDF page size to ensure the best fit.
Cut around the box pattern on the solid black lines. Try to make your cuts very straight. The box will be stronger and fit together better if the cuts are very straight.
Using a straight edge and craft knife will make some of the cutting easier, but be sure to protect the table with a cutting mat or thick piece of cardboard. Caution: Be careful. Craft knives are sharp and should not be used by children.
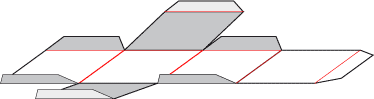
Scoring the fold lines makes for easier folding and sharper creases.
To score: Turn the box with the marked lines up. Score along each of the fold lines—red in this illustration. On cardstock, use the bone folder or empty ballpoint pen to make an indent, not a cut. If you are using cardboard or poster board, use a straight edge and a craft knife or scissors to make a half-cut.
Fold lids and flaps in on the scored fold lines. Flatten the box out again. Fold the glue tab and each side in on the vertical fold lines, then flatten the box.
When using thick cardboard like Bristol board, fold back so that the score is on the outside of the box. Lighter cardboard can be folded either way.
Cut a rectangular piece of decorative paper larger than the box pattern by ¼" to ½" all around. Center and glue to what will be the outside of the box. Fold the excess paper over and glue, or just trim away.
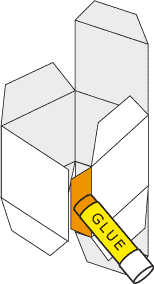
Put glue down the entire length of the glue tab. Shape the sides into a box shape and glue the tab to the inside of the last side. You can use double-sided tape in place of the glue.
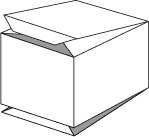
Fold the bottom flaps in and close the bottom lid over them. Tuck the bottom lid's flap inside the box. Repeat for the top lid.
Tip: Make a stronger box by putting a piece of cardboard, cut to size, in the bottom of the box. You can also glue the bottom flaps to the box's bottom, but the box will no longer be collapsible.
That's it! Your box is complete!

Tip: Boxes fold flat for easy storage.

Tip: The 'Mom' and St. Valentine's Day cube box patterns include bonus stickers. Use them to make a matching gift tag or to decorate a card. You could also hide them in places for Mom to find.
Project Extras: Use these bonus patterns with 12" by 12" cardstock to make larger versions of the cube and tall collapsible boxes—3" cube and 6" by 2.5" box.
To use these patterns either print directly to 12" by 12" cardstock, if your printer handles larger formats, or tile the pattern to letter-size (A4) paper, using Page Scaling: Tile Large Pages to print in Adobe Acrobat. The tiled pattern can then be taped together and traced or transferred to the 12" by 12" cardstock.

Related project: For how to make another version of the cube box, see the Little Gift Boxes craft project.


