
")
Make a rectangular box with a lid, also called a shirt box, in a variety of sizes and depths. This is a very versatile box that can be used to package almost any gift. It can also be made without the lid and used as a letter box, napkin holder, etc.
Small rectangular boxes are perfect as party favors and for packaging sweets and candies. The project includes a printable pattern for a Halloween treats box with a plain version that you can decorate for any holiday or special occasion. There are also printable patterns for small, deep boxes in seasonal colors for Christmas, and another with a stars and confetti top for birthdays.
Custom size box: To make a rectangular box in any size you like, follow the instructions for drafting your own rectangular box pattern in the Make a Custom Rectangular Box Pattern craft project.


Choose a box to make. Download and print the pattern.
Make
a lightweight box by printing directly on cardstock. For a stronger
box, print on computer paper and trace or transfer the pattern to
cardboard before proceeding.
Follow the same instructions for both the box bottom and box top (lid).
Pattern Transfer TechniquesPatterns are Adobe PDF files. The Adobe Reader is available for free.
All of Aunt Annie's project patterns are designed to be printed on standard letter-size paper (8.5"x11" or A4). When printing from Adobe Reader, you may need to select Auto-Rotate and Center or Choose paper source by PDF page size to ensure the best fit.
Cut around the box pattern on the solid black lines. Try to make your cuts very straight. The box will be stronger and fit together better if the cuts are very straight.
Using a straight edge and craft knife will make some of the cutting easier, but be sure to protect the table with a cutting mat or thick piece of cardboard. Caution: Be careful. Craft knives are sharp and should not be used by children.
 Fold
Lines
Fold
Lines
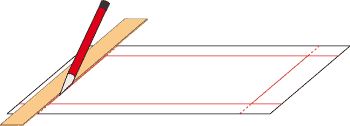
Score along each of the four fold lines. Scoring the fold lines makes for easier folding and sharper creases.
To score: Turn the box pattern with the marked lines up. Score along each of the fold lines (red in this illustration). On cardstock, use the bone folder or empty ballpoint pen to make an indent, not a cut. If you are using light- to medium-weight cardboard or poster board, use a straight edge and a craft knife or scissors to make a half-cut.
Heavy cardboard requires a cut score. Make a cut score by cutting all the way through the cardboard in a series of dashes. Hold the craft knife against a straight edge to make the cuts. Long cuts increase the flexibility of the fold, but weaken the cardboard. Base the length of the cuts and the space between the cuts on your need. You may want to do some testing on a scrap of cardboard.
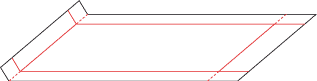
Fold one side along the score line, then unfold. Repeat for the other three sides. When using thick cardboard like Bristol board, fold back so that the score is on the outside of the box. Lighter cardboard can be folded either way.
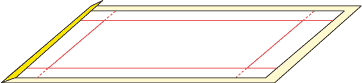
Cut a rectangular piece of decorative paper larger than the box pattern by ¼" to ½" all around. Center and glue to what will be the outside of the box. Fold the excess paper over and glue, or just trim away.
Tip: It is very important to use a very good adhesive when covering a box with decorative paper, or laminating. Glue sticks and glues marked as suitable for children will not give a strong enough bond. When using a spray adhesive, follow the instructions for a permanent bond.
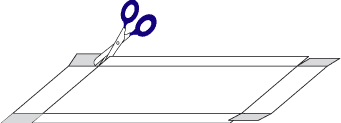 Step 6: Snip Corners
Snip each corner on the dashed line. This creates the glue tabs needed to assemble the box.

Fold the cardboard into a box shape. Be sure the glue tabs are on the inside. Glue the tabs to the sides of the box with a good craft glue. You can also use staples or tape.
Follow the same instructions for both the box bottom and box top (lid).
That's it! Your box is done!

Tip: Print the plain pattern on the back of patterned cardstock.

Tip: Save scraps of cardstock and cardboard. They can be used to make gift tags or to reinforce bag bottoms.
Bonus Patterns

Tip: Use the Halloween Treat Boxes pattern to package your Halloween candies and sweets. The plain pattern can be used to make favor boxes for any holiday or party theme.

Tip: Print Christmas box patterns in holiday season red or green. The patterns come in two options—plain white or polka dot bottoms. Decorate the box top with Christmas Quilling or in anyway you like! Check out the coordinating Christmas Dots digital papers.

Tip: To package your birthday gift, print and make the Birthday Box pattern featuring stars and confetti. Check out the coordinating Stars and Confetti digital paper.

Tip: Make your own patterned cardstock by printing a design on white cardstock, then printing the box pattern on the back.
The marbled paper for this box top was created by printing Aunt Annie's marbled swirls digital paper on white cardstock.

Tip: Cover box lids with decorative tissue paper. See how easy it is to create your own fancy tissue in the Tissue Paper Painting craft project.


