

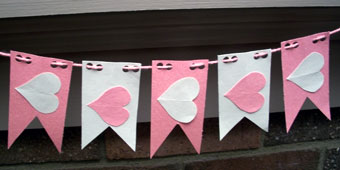
Much like shouting your love from the rooftops, show off your Valentine’s Day enthusiasm with this fun and easy paper flag banner craft. The simple to cut flags are decorated with hearts, then strung together with string or yarn to create a banner. Hang the banner in a doorway, over the mantel, or in the window, or use it to decorate a Valentine-themed bulletin board. No pattern required—just cut, glue and string.
This project is great for family, classroom or group craft time. It requires no patterns and uses simple materials. With a little preparation by the adults or teen leaders, this project is fast and fun.
Related craft: It's easy to make flag banners for any holiday or theme, like a St. Patrick's Day Shamrock Flag Banner. It is made with white construction paper flags decorated with green construction paper shamrock cutouts.


Select paper colors and pre-cut paper blanks. Scraps of construction paper, colored craft or computer paper leftover from other projects work well. The blanks for flag hearts need to be approximately 2" (5 cm) square, and the blanks for the flags need to be about 2" by 3" to 4" (5 cm by 7 to 10 cm). For best results, the blanks need to have straight sides and square corners. The sizes can vary a bit.
Tip: If you want larger or smaller flags, just maintain similar proportions. For example, you can easily cut six 3" by 6" rectangles or three 4" by 8" rectangles from a single sheet of 9" by 12" construction paper for large flags. Size the the squares for the heart cutouts to match—that's 3" and 4" squares, respectively. Go even larger with three 6" by 12" flag blanks cut from a 12" by 18" sheet of construction paper and 6" heart cutout squares.

The flag banners can have from 3 flags to 12 flags. For each flag, fold a flag blank in half lengthwise. Cut on a diagonal from one corner toward the fold. Punch two holes next to each other on the opposite end and away from the fold. Open the flags and smooth the paper flat.
Cut a heart for each flag (or two if both sides of the banner will be seen.) For each heart, fold the heart blank in half and cut a half heart shape from the top of the fold to the bottom. Open the hearts and smooth them flat.
Tip: Show children how to cut this shape, and if they are struggling, draw the cut line on the paper freehand, or use a template. Avoid using templates if you can because some of the charm of the flags is in their variety of shape, size and color.
Tip: Keep the heart cutaways and use them to make Easy Valentine Cards.
Glue a heart on each flag or two hearts—one on each side. Glue them horizontally or vertically, depending on how the flag banner will be displayed.
Cut a length of yarn long enough for the number of flags and where it will be hung — usually 4 to 6 feet (1 to 2 meters.) Weave the yarn through the punched holes on the flags (children may need help here). A blunt yarn needle can make the job go faster.
Hang the banner using tape, tacks or whatever is appropriate for the place/surface being decorated with the banner.
That's it! Stand back and enjoy your creation.