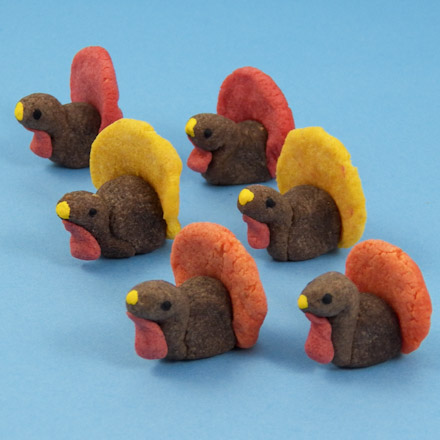
It's easy to make playing pieces for your homemade games using Homemade Modeling Dough or commercial air-dry clay. In this project, you'll make miniature turkeys modeled from dough or clay for the game of Turkey Trot. Or, make the turkeys for a diorama, or just for fun! Use the same idea to create playing pieces for other games, like racecars for the Racetrack Board Game.
This craft project requires few materials and is great for family, classroom or group craft time. The modeling dough can be made in advance and stored ready-to-use in the refrigerator.
Related crafts: Use Homemade Modeling Dough to make Pencil Toppers and Refrigerator Magnets.

Make a full or half-batch of Homemade Modeling Dough. Use enough flour to make a rather stiff dough. Separate the dough into four balls and mix in food coloring to make yellow, orange, red, and brown balls.
Tip: You can also make the turkeys from air-dry clay that can be painted after it dries.

For each turkey playing piece, pinch off dough and form two brown balls—1/2" and 1/3"—for the turkey's body and head. For the turkey's wattle, make a 1/8" red ball.
For the turkey's tail, form two balls—1/2" and 1/3"—using two colors: red and orange, red and yellow, or orange and red. Vary the tail color combinations so that each turkey playing piece is unique.

Roll the smaller brown ball into a tapered shape, then form it into the head and neck of the turkey. Shape the larger ball to form the turkey's body, and attach the head/neck to the front end. Set the turkey on the waxed paper, and flatten the bottom so it sits nicely.
 Flatten
both of the colored balls for the tail into fan shapes, and layer the
smaller one on top of the larger one, aligning the bottoms.
Roll the red ball for the wattle into a teardrop shape—narrow at the top and with a bulge at the bottom.

Attach the tail to the back end of the turkey and press the wattle in place under the turkey's chin.
Tip: For a stronger hold, wet and roughen the surfaces of the parts before joining them.
 Use
a toothpick or plastic knife to mark a few feathers on the back of the turkey's tail.
Make several turkey game pieces with different-colored tails. Set aside the turkeys to dry for a day or two. Place in a warm spot with plenty of air circulation to speed up the drying process.

After the turkey playing pieces are dry, use acrylic paint to make eyes and a beak on each turkey.
Tip: You can make the game pieces more durable by coating them with acrylic varnish or clear fingernail polish.
That's it! Your turkey game pieces are complete!