

In this tutorial, you'll learn how to make cards and envelopes from simple materials, decorate the card with four patches of fancy paper, and finish things off with a simple embellishment.
A card-making idea I'll be passing onto you is one from my sister. It's how to use a single 6" by 6" piece of decorative paper to make two greeting cards OR two coordinating 6" by 6" sheets (light and dark, or plain and patterned of the same color) to make four cards.


One of the most economical ways to make greeting cards is by using white, letter-size (A4) cardstock and computer paper. A 250-sheet ream of 8½" by 11" white cardstock makes 500 cards, and a 500-sheet ream of white 20# paper makes 500 envelopes. That works out to a few pennies for a card and envelope.
For a Card
Cut a full sheet of cardstock in half to make two 8½" by 5½" card blanks.
Fold the card blank in half to make a 4¼" by 5½" card.
Tip: For crisp and accurate fold lines, use a scoring board like the
DIY
Scoring Board.
For an Envelope For an Envelope
Trace or print an envelope template onto a sheet of paper.
Cut, fold and glue according to instructions.
See the
Envelopes to Make
craft project for templates and instructions.
Here are some templates from
Canon Creative Park to use:
https://creativepark.canon/en/contents/CNT-0003132/index.html
https://creativepark.canon/en/contents/CNT-0004639/index.html
The templates are Adobe PDF files. The Adobe Reader is available for free.
Select one decorative paper or two papers (one light and one dark of the same color, or one plain and one patterned of the same color).
Tip: The decorative paper used for the sample cards is Aunt Annie's free, downloadable Red marbled stones digital paper. You could also use the Marbled heart stones digital paper, other digital papers in the Marbled paper series, or any of Aunt Annie's digital paper downloads.
Cut two rectangles measuring 3½" by 2¼": one of each paper, or two from one 6" by 6" paper. Use this layout to make good use of a 6" by 6" sheet of paper.
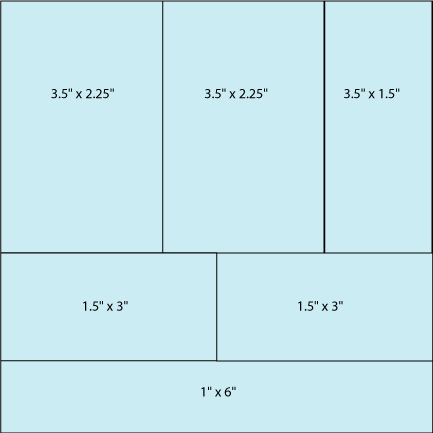
Download a PDF file with the suggested layout and cutting templates to size.
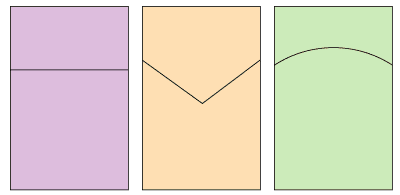
Stack the two rectangles and, while holding them firmly together, cut horizontally about 1/3 from the top. The cut can be straight, V-shaped or curved, but the beginning and ending of the cut must be the same distance from the top.
Arrange the four cut pieces on the card to your liking. To make cards like the examples, separate the patches with equal spacing both horizontally and vertically, and, when using two different papers, swap the tops or bottoms.


Create a medallion for the card center—cut a 1" to 1½" square of cardstock, or punch a 1" circle. Decorate with a rubberstamp or with punched paper.
Glue the medallion to the center of the card.
Tip: For an added touch, stick the embellishment on the card using double-side foam tape. This will give it a 3D look. A piece of corrugated cardboard can be used in place of the foam tape—just cut it to size, glue it to the back of the embellishment, then glue it to the card.
Tip: Use Aunt Annie's Heart Cutouts printable to make heart medallions for your card.
 The remaining paper from the 6" square(s) can be used to make another card or to decorate the inside of the card or the envelope.
The example card uses the two 1½" by 3" rectangles with the 3½" x
1½" rectangle underneath, all on a 4" by 5" black background.
The remaining paper from the 6" square(s) can be used to make another card or to decorate the inside of the card or the envelope.
The example card uses the two 1½" by 3" rectangles with the 3½" x
1½" rectangle underneath, all on a 4" by 5" black background.
Tip: There will be more design continuity if the card's message is decorated similarly to the card front.


Digital paper Extra: Download and print Triangle Patchwork and XO Repeats Hugs and Kisses digital papers to make Four Patch Cards.

Printable: Print the Heart Cutouts on cardstock. Use the hearts as a medallion for cards made with Triangle Patchwork and XO Repeats Hugs and Kisses digital papers.

Digital paper extra: Download and print Sky Blue Mixed Dots digital papers. Use the digital papers alone or combined with yellow or blue colored paper to make Four Patch Cards!


Tip: This flip-flop embellishment was cut from leftover paper, glued on cardstock and trimmed.

Tip: Use decorative-edge scissors to cut the right edge of the card, then glue a strip of paper to the inside of the card.

Tip: Paper punches make nice embellishments, and a pencil outline enhances the card's appearance.

