

Make a flared-top box with fold-over flaps in a variety of sizes and shapes that is inspired by Chinese takeout boxes. These are wonderfully elegant boxes that increase in size from a square or rectangular base to lid flaps that flare out from the top.
These boxes have many uses: for instance, as packaging for small gifts or as containers for gifts of food like nuts, dried fruits and candies. The tall box can be used as a vase for dried flower arrangements or to display a beautiful Paper Flower Bouquet.
Bonus patterns: This project also includes patterns for more traditional Chinese takeout boxes with fold-over flaps and a tab closure. They are great for party favors.


Choose a box to make. Download and print the pattern.
Choose a pattern that prints in color, select
a black & white pattern to print on colored cardstock, or use your creativity to decorate the box.
Make a lightweight box by printing directly on cardstock. For a stronger
box, print on computer paper and trace or transfer the pattern (see
how) to
cardboard before proceeding.
Patterns are Adobe PDF files. The Adobe Reader is available for free.
All of Aunt Annie's project patterns are designed to be printed on standard letter-size paper (8.5"x11" or A4). When printing from Adobe Reader, you may need to select Auto-Rotate and Center or Choose paper source by PDF page size to ensure the best fit.
Give the box a decorative look with art paper. Glue the paper to the reverse side of the cardstock.
Tip: It is very important to use a strong adhesive when laminating decorative paper to cardstock. Glue sticks and glues marked as suitable for children will not provide a strong enough bond. When using a spray adhesive, follow the instructions for a permanent bond. Double-sided sheet adhesives are convenient but more expensive than other options.

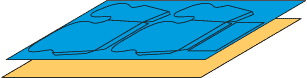
Cut around the box pattern on the solid black lines. Try to make your cuts very smooth and accurate. The box will be stronger and fit together better if the cuts are made neatly.
The box will have either two or three pattern pieces. The larger pieces are the box sides, and the smaller rectangular or square piece is the box bottom.
Chinese takeout box: Use a craft knife to cut the slit marked on one of the lid flaps.
Using a straight edge or ruler and craft knife will make some of the cutting easier, but be sure to protect the table with a cutting mat or thick piece of cardboard. Caution: Be careful. Craft knives are sharp and should not be used by children.
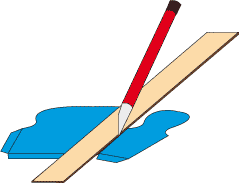
Score the box side piece(s) on each straight line. To score, place the straight edge or ruler along a straight line. Use a dull point, like an empty ballpoint pen or bone folder, and run it along the line using the straight edge as a guide. On cardstock, the score should just be an indent to aid in making folds.
If you are using light- to medium-weight cardboard or poster board, use a straight edge and a craft knife or scissors to make a half-cut.
Fold on each scored line. Make the creases sharp by running your thumbnail the length of the fold line.
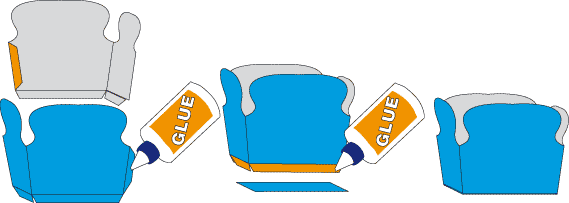
Using the side glue tab(s), glue the side piece(s) together to form a box shape. Be sure that the glue tabs are on the inside. Glue the tabs to the sides of the box with a good craft glue.
Fold the bottom glue tabs over, apply glue, and attach the box bottom. Let the glue dry.
You can leave the box plain or decorate it with stickers, paper cutouts, stencils, stamps, etc. Use tissue paper to wrap gifts placed in the box, and use wax paper for gifts of food. The box may be left open, or you can fold the knobbed tops over and tie them closed with a ribbon—either way, your gift will look elegant in this box.
Chinese takeout box: To close the box, fold the smaller flaps in, and then fold over the flap with the slot. Finally, fold over the last flap and slip the circle tab into the slot. You can seal the box with a sticker or tie a ribbon around the box.
Your box is now complete!

Tip: Use Aunt Annie's coordinating violet, purple and blue polka-dot digital papers with the colored box patterns. Or the Cool Color Simple Stripes digital papers.


Tip: Roll back the flared box flaps to create a decorative container or a vase.
For this vase, Aunt Annie's Orange Gingham Check digtal paper was printed on the back of textured white cardstock. The box pattern was then printed over the gingham.

Tip: Adhere decorative paper to the back of colored cardstock with the box pattern printed on the front. Make the box with the decorative paper on the inside or on the outside.
These boxes were made with Aunt Annie's Cool Dots digital paper.

Tip: For more traditional looking takeout boxes, use one of the Chinese takeout box patterns. Print the black & white patterns on white or colored cardstock. The colored patterns feature designs from Africa.
The paper fortune cookies are 3" circles folded in half without a crease and then pinched in the center and glued.


