

Make an oval box with a lid in a several sizes and depths. The technique used to make these boxes is based on the band boxes popular in the 19th century, and is well-suited to making boxes with curves, like this oval box. This is an elegant box that will complement that special gift. In fact, a well-made and decorated oval box is a gift unto itself.
Related crafts: Make a Valentine Heart Shaped Box or a Christmas Tree Shaped Box using the same banded box technique.
Custom size box: To make an oval box in any size you like, follow the instructions for drafting your own oval box pattern in the Make a Custom Oval Box Pattern craft project.
Read more about Yankee band boxes at the end of this project.


Choose a box to make. Download and print the pattern. The smaller
box patterns (3.5" by 2.6") include both the box bottom and top (lid). For the
large box (4.75" by 3.5") there are separate patterns for the bottom and top of the
box.
Make
a lightweight box by printing directly on cardstock. For a stronger
box, print on computer paper and trace or
transfer the pattern to
cardboard before proceeding.
Follow the same instructions for both the box bottom and box top (lid).
Patterns are Adobe PDF files. The Adobe Reader is available for free.
All of Aunt Annie's project patterns are designed to be printed on standard letter-size paper (8.5"x11" or A4). When printing from Adobe Reader, you may need to select Auto-Rotate and Center or Choose paper source by PDF page size to ensure the best fit.
Cut around the box pattern pieces on the solid black lines. Try to make accurate cuts. The box will be stronger and fit together better if the cuts accurately follow the pattern pieces.
Using a straight edge and craft knife will make some of the cutting easier, but be sure to protect the table with a cutting mat or thick piece of cardboard. Caution: Be careful. Craft knives are sharp and should not be used by children.
Tip: The side strips for the larger box are in two pieces. You may find it easier to glue the strips together at this point rather than in Step 5.
With a ruler or straight edge, make a score line along the bottom of the tabs on the side strip(s).

To score: Turn the side strip pattern with the marked lines up. On cardstock, use the bone folder or empty ballpoint pen to make an indent, not a cut. If you are using light- to medium-weight cardboard or poster board, use a straight edge and a craft knife or scissors to make a half-cut.

Fold the tabs over, then unfold to about a 90° angle. When using
cardboard, fold back with the score on the outside of the box. With
cardstock, fold the printed side in.

In preparation for gluing, bend the side strip around the oval cutout. Start the strip at a midpoint of a side. If the side strip is too long, adjust it by cutting a little from one end. If the side strip is too short, cut the box top down a little.

Coat the inside of the glue tabs with a thin layer of white glue. Apply a band of glue around the perimeter of the oval cutout. Make the band of glue as wide as the depth of the tabs. Wrap the side strip(s) around the oval cutout, pressing the glue tabs firmly in place. Apply glue to both ends of the side strip overlap(s) and press together.

Tip: For a finished look, glue the other oval cutout on top to hide the tabs.
Repeat steps 1 through 5 for the box lid. Glue the second lid oval onto the lid to cover the glue tabs.

You can cover the sides of the lid with decorative paper or ribbon prior to gluing the second oval cutout in place. Cut a strip of paper the same size as the side strip. Glue the decorative strip in place, aligning edges. Cut glue tabs on the other edge, fold and glue over existing tabs.

Decorate the box lid as you like. Nested ovals of contrasting paper or medallions are easy ways to embellish the lid. Use the insert patterns as a guide to cut the nested ovals.
That's it! Your box is ready to use!
The construction techniques used in this project were inspired by traditional Yankee band boxes. Yankee band boxes first appeared in the 1800s to store men's collar bands. The boxes were round, made of pasteboard or thin wood, and the edges were sewn on with an overcast stitch. The box was then lined with newspaper and covered with wallpaper.
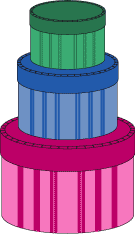
Soon after the boxes' introduction, people realized that these boxes were versatile and could also be used for travel and storage. The popularity of Yankee band boxes peaked between 1820 and 1850, when they were available in a wide variety of shapes and sizes. Oval and round boxes were most popular and were often sold as nesting boxes. Make your own nesting boxes by constructing a series of oval or round boxes that decrease in size and fit inside one another. Tip: See the instructions for drafting your own oval box pattern in the Make a Custom Oval Box Pattern craft project.

Tip: A strip of decorative paper can be glued over the side strip. Striped paper, as in this example, works well.

Tip: Use rubber stamps and a watermark stamp pad to decorate the inside of dark colored boxes.

Tip: The Oval Box in orange pattern includes the choice of two lid tops and two decorative inserts.

Tip: The Oval Box in blue pattern can be made with a plain blue lid or with the floral inset. The plain box has an inner collar added to reveal more of the bottom's stripes when the box is closed (see image below). The stripes and floral patterns coordinate with Aunt Annie's Hawaiian Orchid digital paper downloads.


Tip: The oval boxes can be made taller by adding an inner collar. Use the bottom's side pattern piece as a template and add ½" to ¾" to the height. Test the collar before gluing in place.


