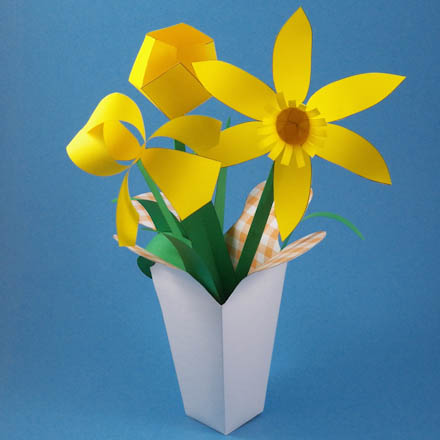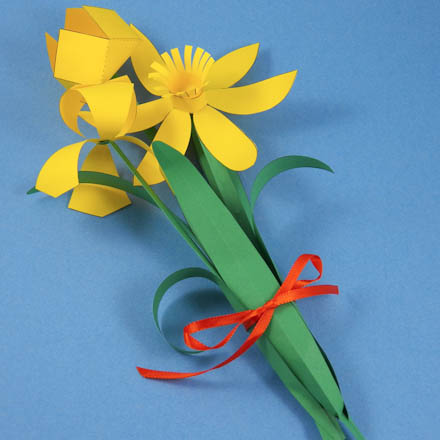
In this project, craft flowers from computer paper. You can make a paper daffodil, a paper tulip and a paper iris, complete with stems and leaves. Use ribbon to tie them up in a bunch, then give them to someone special. The flowers are also wonderful party favors and gift package decorations.
Related projects: For more fanciful flowers, see the Paper Flowers project, and for a simple vase see the Shamrock Centerpiece project or the Flared Boxes project.
Print both the Spring Flowers and the Stems and Leaves patterns. Print the black and white Spring Flowers pattern on yellow paper, and the black and white Stems and Leaves pattern on green paper. Another option is to print the black and white patterns on white paper and trace the patterns onto colored craft or construction paper. You can also print the colored patterns on white paper, but the pattern pieces will have white backs unless you print something on the back.
To make a bouquet of just daffodils, print the Paper Daffodil and the Stems and Leaves patterns. For more daffodil options, see Paper Daffodil Patterns.
To make a bouquet of just tulips, print the Paper Tulip and the Stems and Leaves patterns. For more tulip options, see Paper Tulip Patterns.
To make a bouquet of just irises, print the Paper Iris and the Stems and Leaves patterns. For more iris options, see Paper Iris Patterns.
To make a bouquet of nothing but irises, print the Paper Iris and the Stems and Leaves patterns.
Patterns are Adobe PDF files. The Adobe Reader is available for free.
All of Aunt Annie's project patterns are designed to be printed on standard letter-size paper (8.5"x11" or A4). When printing from Adobe Reader, you may need to select Auto-Rotate and Center or Choose paper source by PDF page size to ensure the best fit.
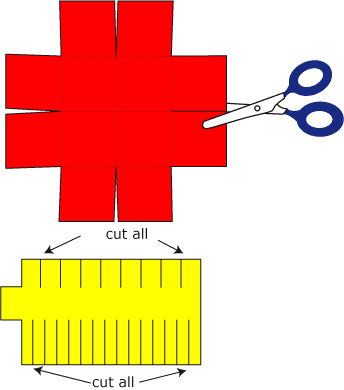
The flower pattern has the petal pieces for all three flowers and the leaf pattern has three sets of stems and leaves. Cut out each pattern piece on its black outline. Be sure to cut inward on the four solid black lines on each side of the tulip pattern. Also cut inward on the top and bottom of the daffodil center. The short black lines form the flower's fringe and the bottom of the daffodil cup.
Tip: If you are using construction paper, trace the leaves and stems onto green paper and the flowers onto yellow, red or purple paper as you like.
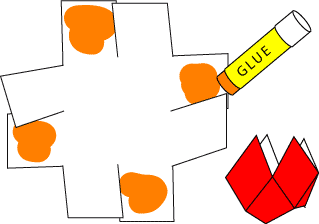
Make creases on all the dotted lines on the tulip pattern by folding inward (toward the printed side), and then unfold. The pattern has two loose squares on all four sides. On each side, glue one of the squares completely on top of the other one at a right angle.
Tip: Spread the glue thinly and evenly before pressing the side pieces together.

Using a round pencil or pen, roll every other iris petal slightly downward. Curve the other three petals up and toward the center. Take two of the upwardly curving petals, overlap about ¼" (.6 cm), and glue together. Overlap and glue the third petal to the other two.
Tip: Use small dots of glue where the upper petals overlap.
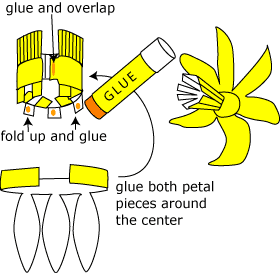
DAFFODIL CENTER: Form a cylinder out of the daffodil center piece. Fold the fat, short tabs under and glue together to form the bottom. (A dot of glue on every other tab may be enough.)
DAFFODIL PETALS: Fold petals up to stick out from the ring (perpendicular to ring) on both petal pieces. Glue the first petal ring around the daffodil center, overlapping the ends about ¼" (.6 cm). Glue the second petal ring on top of the first one, with its petals centered between the petals of the first ring.
FINISHING: Use a round pencil or pen to curl the center fringe outwards. Curl 2 or 3 pieces of fringe at a time. Give all the petals a slight forward curve with the pencil.
Tip: Use glue sparingly on this flower to avoid sticky fingers. Place the two petal rings snugly around the center cup.
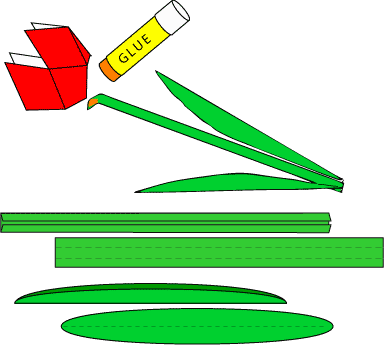
Fold the stem pieces lengthwise along both long dashed lines. Unfold one edge and apply glue down the length of the stem. Refold sides together and press to smooth.
Fold the leaf pieces lengthwise along the center dashed line, but do not glue. Glue the bottom tip of the leaves to the bottom end of the stem at a very slight angle. Use your fingers to give the stems a slight curve near the top. Then bend over a small ¼" to ½" tab (6 cm) at the top of the stem for gluing to the bottom center of your flower.
Tip: Use a ruler or straight table edge to help start the folds.
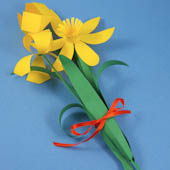
Hold your flowers together in a loose bunch, and tie a ribbon around the stems and leaves about 2" to 3" (5 cm) from the flower bases. Display the flowers in a flower vase or pencil holder. You could also make a simple paper vase—see the Shamrock Centerpiece project or the Flared Boxes project.
Tip: Instead of ribbon, use the paper band on the flowers pattern to tie up the flower bouquet.
That's it! Your bouquet is done!
