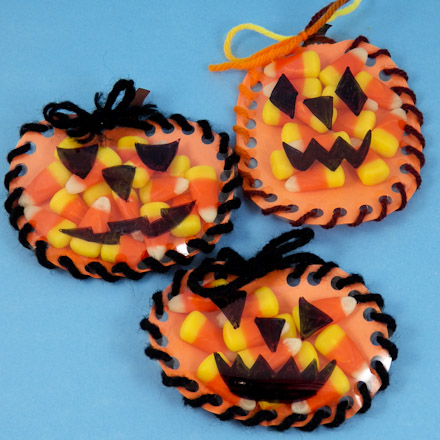
Create these truly unique pumpkin-shaped Halloween party favors by sewing an orange pumpkin and a clear pumpkin together, and then filling it with candy corn. This is an easy craft that's a twist on the traditional Sewing Cards craft for kids. It's also a good craft for using up scraps of yarn and recycling old, clear plastic report covers.
This is a great group or classroom craft project. With a little help from adults or teenage leaders, even younger children can be successful.
» » Basic Craft Box plus clear plastic, yarn, permanent black marker and candy corns. « «
Read through the project and gather the materials needed for creating the pumpkin party favors. If you are doing this craft with a group, pre-cut the paper and clear plastic to make the craft go faster.
Cut the orange construction paper into six equal pieces that are 4½" by 4". Cut similar-sized pieces from the clear plastic. You should be able to get twelve approximately 4½" by 3½" cutouts from one report cover—six cutouts from the front and another six from the back.
Draw or trace the shape of a pumpkin on the orange paper using a pencil.
Tip: Use one of Aunt Annie's pumpkin shapes if you like. Print the pattern directly on orange paper, or print on cardstock to use as tracing templates.
Holding the clear plastic and orange paper firmly together, cut out the pumpkin shape. If you drew a stem on your pumpkin, cut the stem off the clear plastic pumpkin.
Tip: Use two paper clips to hold the plastic and orange paper together while you cut.
Draw a face on the clear plastic with a black permanent marker. Make the face scary or funny, with eyes, nose and mouth like a jack-o'-lantern. Color the pumpkin stem with a brown marker.
Tip: Don't use washable markers, as they will smear!
Holding the pumpkin shapes together (use paper clips if you like), punch holes around the edge of the pumpkin. Start at the top center of the pumpkin and space the punches about ¼" apart.
Cut a 36" length of yarn. Sew the shapes together with the yarn, starting at the top center. Leave a long tail and start sewing from the front. While you can use a simple running stitch, an overcast stitch works best! See the Sewing Cards craft project for how to make overcast stitches.
Stop a few holes from the end, and fill the pumpkin with about a dozen pieces of candy corn. Finish sewing and tie the ends into a bow. Trim the yarn ends, if needed.
Tip: Trim the yarn end if it becomes frayed as you sew. To avoid fraying, use a yarn needle or wrap the end of your yarn in tape.
That's it! Your sew-a-pumpkin
Halloween party favor is done!
